• Skip to content
  • Skip to primary sidebar

A Stack of Dishes

Something good is cooking...

  • Home
  • About
  • Recipe Index
    • Bakery
    • Dessert
    • Chocolate
    • Appetizers
    • Healthy Recipes
    • Main Course
    • Small Meals
    • Breakfast
    • Gluten Free
    • Side Dishes
    • Cocktails
    • Condiments
    • Gifts
  • Delicious Links

GF

Roasted Acorn Squash with Grilled Tofu and Quinoa {And My New Approach to Change}

January 4, 2013 by Gail Watson

Welcome to the New Year! I too have joined the masses of the “New Year, new me” campaign. I will not bore you with my enthusiastic promises and misty eyed visions of the improved me- but rather I wanted to share with you my new approach.

Are you like me? I get all jazzed up and rally myself to take on my new improved way of life. I start quick out of the box, full of determination and vigor, and then in short order start stumbling and tripping, and eventually face plant into a heap. The result is another year goes by and nothing has changed. *sigh*

So now that I know what doesn’t work, I decided to try a new approach. The truth be told I’ve been incorporating my new concept since my last birthday, 2 months ago, and it’s been working very well. The inspiration for this really came from my pal, Winnie, from Healthy Green Kitchen. The idea is not to attempt a total makeover- but to focus on one small positive thing I can do for myself, at least once a week. If I can add one positive small shift a week, by the end of the year I would have made 52 easy and gentle improvements. Isn’t that an amazing thought?!!

I say banish self control! Do away with the struggle and the guilt!

*Just do one small good and nice thing for yourself a week* Now isn’t that so much nicer? And even if I don’t compile 52 changes, at least I’m moving in the right direction.

To give an example: I have reduced the amount of sweeteners in my latte and drinks by a bunch. No real science, I’ve just dialed it down by a small amount and I continue to do that each week. The result is I have lowered my sweetness threshold without my really noticing. I’m a little concerned about putting chemicals into my body, as well as natural sugar, but I really love sweet so much! So a smidge of change over time and now I am at about half of what I was consuming 2 months ago.

Another small change I’ve made is to eat one or two more pieces of fruit a week- in my case specifically, citrus. In the past I would run out and fill a beautiful bowl of fruited bounty, all gung-ho about it. The result would be a slow degradation of my display into a wrinkly and mossy science project. The worst part is the double guilt that the sad display taunts me with- both the failed attempt at my new “way” and the terrible waste of good food.

Instead I’ve taken to buying one or two oranges and then I eat them! I don’t keep them in a pretty bowl on the counter, because it turns out I like mine cold. I perch them on the shelf in the fridge so they are right there when I open the door. This way, when I go foraging for that afternoon pick-me-up snack, my orange is right there for the grabbing.

They say that it takes 3 weeks to create a new habit and I can attest that this is true for me.

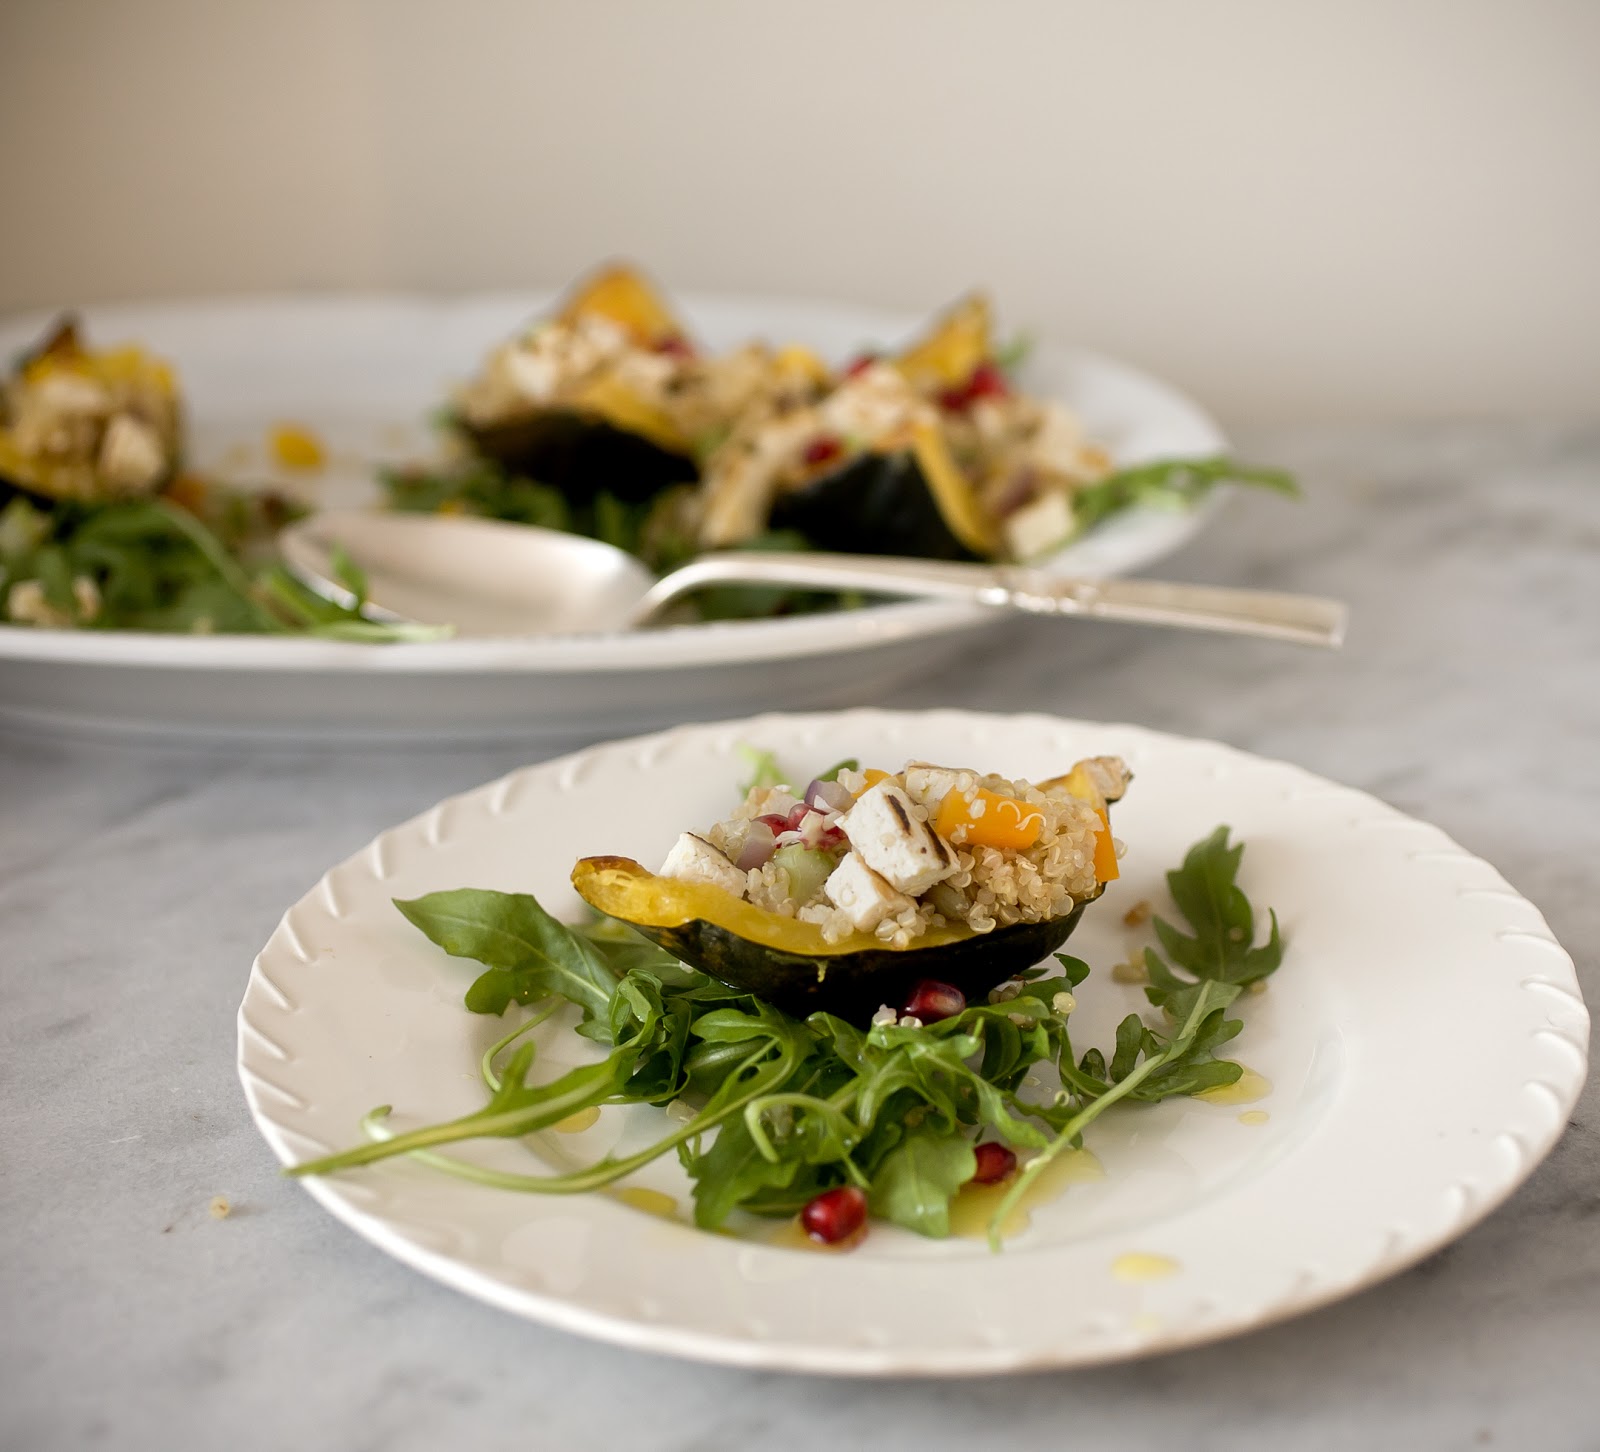
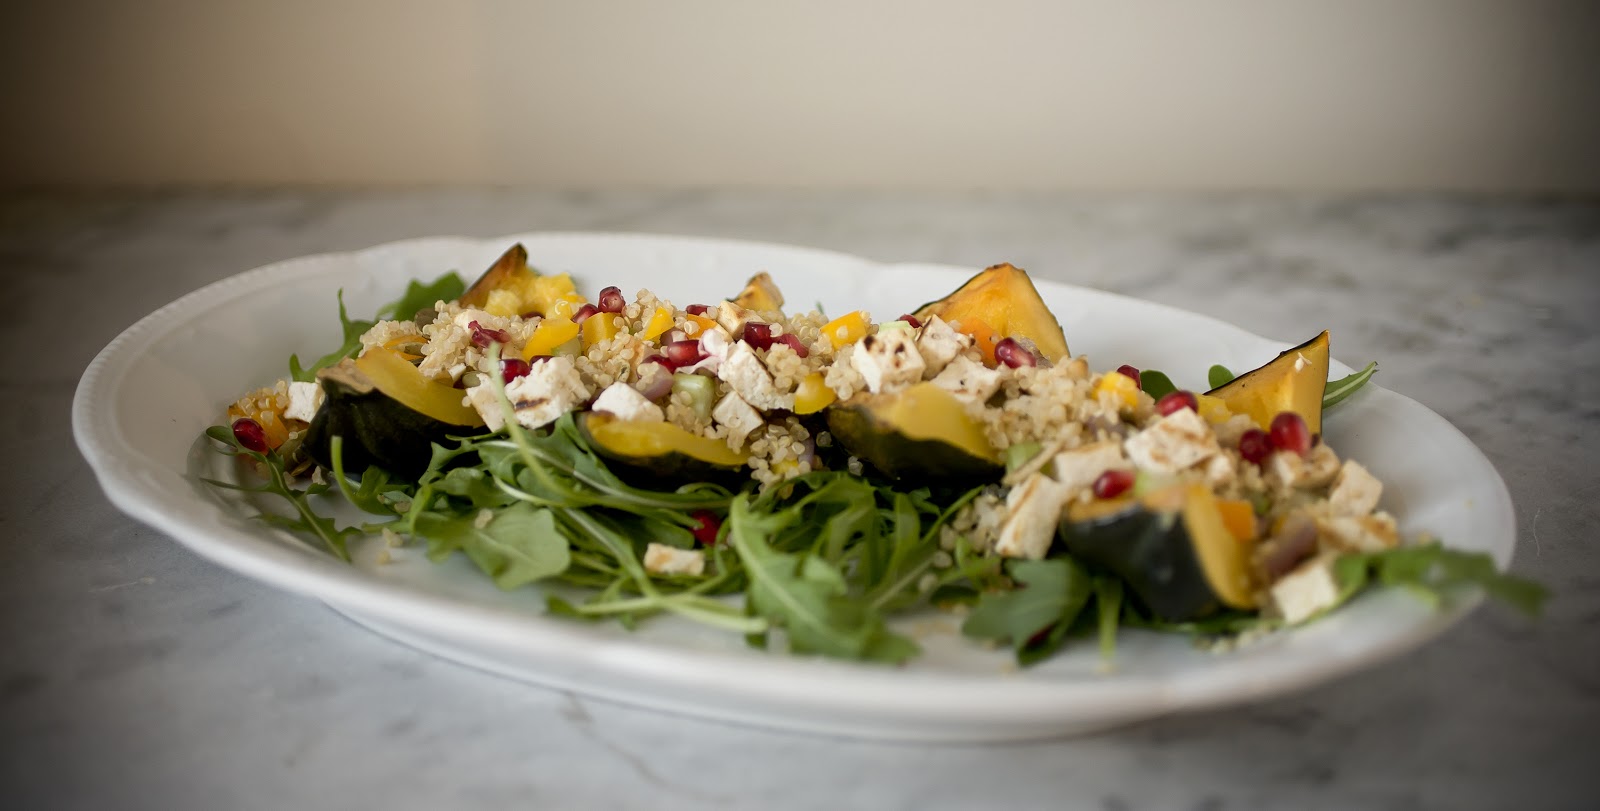
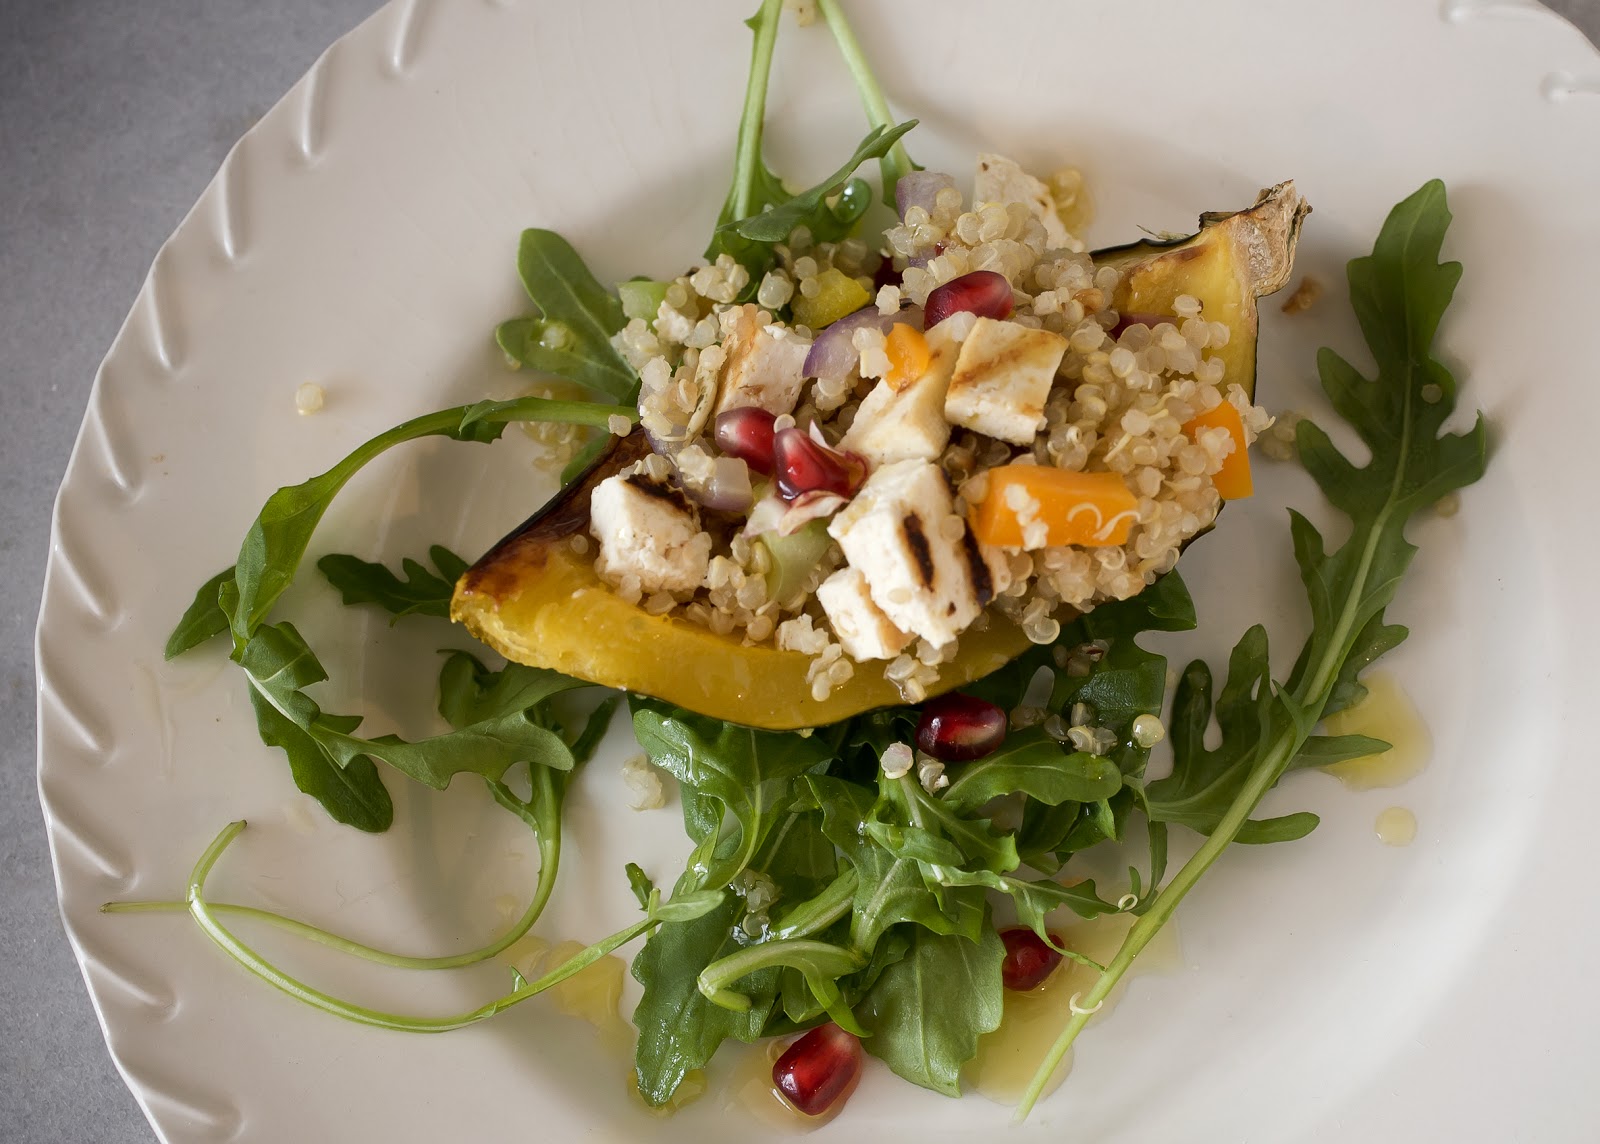
The recipe I have for you today is a delicious and healthy meatless meal. I love this dish and often make several at a time and freeze them. They reheat beautifully. The squash is Vitamin A rich, there is great protein in the quinoa and tofu, and there are healthy complex carbs and lovely fiber.

I’ve gotten word back that not everyone is keen on quinoa or can readily find it. Feel free to switch it with Amaranth- HA! just kidding-That’s another grain I’ll be getting to in the near future- You can exchange any other grain or rice that you prefer, and leftovers are perfect.

Roasted Acorn Squash with Grilled Tofu and Quinoa
This dish looks complicated but it really is not. Make extra and freeze for another day.
serves 6
 
3 medium sized acorn squash
2c of cooked quinoa, or other grain of choice
half a package of firm tofu
1 stalk of celery, diced
1 clove garlic, minced
.25c red onion, diced
1 orange pepper, diced
6 handfuls of baby arugula
.25c pomegranate arils 
3T fresh lemon juice
.5c olive oil
S&P
and oil to sautee
 
Preheat oven to 350˚. Slice the squash in half, scrape out the seeds. Lightly coat the flesh with olive oil and sprinkle generously with salt.
 
Place squash face down on a lined baking sheet and roast until the skin looks a little wrinkly and the flesh is soft. Depending on the size of the squash this should take about 35-40 minutes. When cool slice into quarters- you will have 12 pieces in all.
 
Remove tofu from the package and place onto a clean kitchen towel and press firmly to release some of the moisture. You can also place a plate on top of the tofu with a heavy object and leave for a few minutes to press out the liquid.
 
Heat a grill pan and lightly oil. Slice the tofu into quarter inch slices and grill on each side. Remove from the heat and cut into small dice.
 
In a sautee pan warm some oil on medium high heat. Add the garlic and sautee for 2-3 minutes to release the fragrance. Add the onions, celery and peppers and sautee for just another few minutes leaving the vegetables tender crisp.
 
Transfer the vegetables and the tofu into a large bowl and add the quinoa. Gently stir to combine. Add S&P to taste.
 
Mix the lemon juice and oil to make a dressing. Add a few tablespoons into the quinoa mixture then use the rest to dress the arugula.
 
Lay down a nice layer of arugula for each serving, top with the squash and then fill with the quinoa. Finally sprinkle the pomegranate arils over the top and serve 2 quarters per person.

Share this:

  • Click to share on Pinterest (Opens in new window)
  • Click to share on Twitter (Opens in new window)
  • Click to email a link to a friend (Opens in new window)
  • Click to share on Facebook (Opens in new window)
  • Click to print (Opens in new window)
  • Click to share on Tumblr (Opens in new window)

Filed Under: GF, gluten free, Healthy Recipes, main, main course, sides, Small Tagged With: healthy, healthy main course, heart healthy, meatless meal, quinoa, squash

8 Tips For Making Successful Caramels

December 18, 2012 by Gail Watson

Man do I love me some caramels. They are an awesome holiday food gift and easy to make, and they are also easy to not do well.

People often say to me that they can cook but not bake. Their reasoning is that baking is specific and scientific, whereas cooking is more forgiving. To certain degrees this statement is true, but when it comes to candy making it is hard fact.

Variations in degrees, humidity, ratios or handling can make or break a candy. Some you can get away with, but honestly, not really.

Here are a few best practices and tips for making candies in general and specifically caramels.

1. Thermometer– Pre-test your thermometer for accuracy. A degree or two off can make the difference to how your sugar hardens. To test take a pot of boiling water and completely submerge the thermometer into the water without touching the bottom of the pot. Boiling water is 212˚- no higher or lower. Make a note of where your thermometer lands. If it’s a degree or two off, make a note and adjust your recipe accordingly.

2. Cleanliness– Some recipes call for an absolute grease free environment. Before making candy I rewash all utensils- bowl, pot, spatula, thermometer, measuring instruments, etc.- in hot soapy water and dry with paper towels or air dry. I do NOT use a used kitchen rag.

3. Pure Ingredients– make sure that the sugars you are using are contaminant free. If you used a wet spoon and dipped into the sugar bin, or used a measuring cup that was previously used for flour, this can contaminate the sugar. You can get away with this with baking, but not with candy making.

4. Prepare– Making candy is about timing and readiness. Have all ingredients and utensils prepared and laid out before you begin. Sugar temperatures can change quickly sometimes and you don’t want to be caught unawares.

5. Patience– Don’t rush the sugar boiling stage. A better caramelization happens with a slow development over time. It will also serve you by inadvertently overshooting the temperature when your head was turned for just a moment.

6. Eyes on the Prize– Boiling sugar is it’s own animal. It can turn quickly, and it can also hurt you. Boiling sugar is about the most dangerous thing in the kitchen- boiling oil being second.  If you get splashed with molten sugar it sticks to the skin and can cause nasty burns. So especially with inexperienced kitchen helpers, you MUST stay vigilant.

7. Don’t Stir– This is a very common mistake for first time candy making. Stirring boiling sugar causes the crystals to become unstable and start to bind. The result is grainy, cloudy or lumpy candy. When it comes to making pralines this happens to be the effect you want, but with caramels, absolutely not.  You can stir in the very beginning to incorporate the ingredients, but once it gets boiling, hands off! It will be tempting, even if sugar crawls up the sides, just let it go. Promise me-  you’ll be glad you did.

8. Don’t Touch– It’s also very common to want to poke your fingers into the just finished candy. After all it looks SO beautiful- but it will hurt you. Admire your work- from afar, and give it twice as much time as you think to cool. Sugar is dense and holds its temperature very well, so please err on the side of caution.

I’ve used several different recipes over the years. Martha Stewart printed a recipe in the latest Living issue {December 2012, pg 99} that was a bit different. Typically the heavy cream is added into the hot syrup once it has reached temperature. This recipe added the cream at the start. I was skeptical but I tried it and it was great. Pouring cream into hot sugar is a bubbling, steaming, terrifying and dangerous thing, not to mention often messy with cream boiling over onto the stove (the WORST to clean up). Adding the cream at the start avoided all that. This will now be my method of choice.

Martha Stewart’s Salted Caramels
modified from the December 2012 Martha Stewart Living Magazine
makes approx 120 pieces
 
vegetable oil, for greasing baking sheet
2c heavy cream
2.25c sugar
6T unsalted butter, cut into pieces
1.25c light corn syrup
.5t coarse salt- I used Maldon flaked salt
.5t pure vanilla extract
 
wax paper or cellophane wrappers


Lightly brush bottom ans sides of a 9×13″ rimmed baking sheet with oil. Line with parchment, leaving an overhang, and oil that as well.
 
In a heavy 5qt saucepan, combine the cream, sugar, butter and corn syrup. Bring to a boil over medium heat, and continue to boil without stirring, until the thermometer reads 248˚. It took me about 25 mins.
 
The cream will be bubbly and high at first. It will calm down as it reaches temperature and turn a beautiful caramel color.
 
Remove the pan from the heat and stir in the salt and vanilla. Immediately pour into the prepared pan and do not scrape the bottom. Just let whatever pours out fall into the pan.
 
After 3 minutes, sprinkle the top with more salt to your taste.
 
Allow the caramel to rest, uncovered, overnight or at least 8 hrs.
 
Remove the caramel from the pan and peel away the paper. With a sharp knife cut the caramels to the shape you want. .75″x 1.25″ is the size she made.
 
Immediately wrap in cellophane or wax paper. 

Enjoy, be safe and have fun. Your friends will love you for making these.

Share this:

  • Click to share on Pinterest (Opens in new window)
  • Click to share on Twitter (Opens in new window)
  • Click to email a link to a friend (Opens in new window)
  • Click to share on Facebook (Opens in new window)
  • Click to print (Opens in new window)
  • Click to share on Tumblr (Opens in new window)

Filed Under: GF, gifts, gluten free Tagged With: candy, caramels, gifts, gluten free, sweets

Chocolate Mousse {No Cream}

December 17, 2012 by Gail Watson

Growing up my Mother owned a restaurant out on the North Fork called, The Cinnamon Tree. It was a cozy restaurant in the middle of the victorian fishing town. Before the restaurant business my parents had been in the antique business and had a great collection of remarkable things. The restaurant was decorated with antique lights, artwork, giant peer mirrors and stained glass. It provided more of a homey atmosphere, and two Chesterfield leather sofas flanked a large fireplace that, in the colder months, folks would gather around and drink away the darkness.

Most of the other restaurants in the area around served baked clams and shrimp cocktail. On her menu were more elegant things like, Chicken Cordon Bleu, Stuffed Flounder, and a dessert similar to this called: Chocolate Yummy Rummy.

It was a gorgeously decadent dessert that remained on the menu for the entire 24 years that the restaurant was open. It was light and delicate in consistency, and a little went a long way. I used to watch the cooks in the kitchen make enormous bowls of it and then ladle small dollops into individual parfait glasses. It is mesmerizing to watch chocolate fold into creaminess. Somewhere along the line my Mom gave me a copy of the recipe, but I have no idea where it might be, and then, I might not give away the family secret.

What I really liked best about the Chocolate Yummy Rummy is that it did not rely on whipped cream for its loft and moussiness. As a result it’s more chocolately and velvety.

For my holiday meal last night I looked for a comparable recipe and found one that I modified a bit. In retrospect I would add more rum for a slightly more boozy edge, but no complaints here- and if you’re serving a younger crowd you could leave it out entirely.

I served mine with a soft billowy sweetened whipped cream to offset the chocolate- but straight without embellishment is more than fine. This is the time to invest in the best quality chocolate you can get your hands on. If you want someone to fall in love with you, I would put this on the menu.

Chocolate Mousse
This is extremely decadent so a small bit goes a long way. This batch makes enough for 8-10 servings
The mousse needs time to set, so it’s best prepared the day before or morning you plan to serve it.
If you prefer not to add alcohol simply add 2T of water to replace it.
 
6oz best quality dark chocolate
8T unsalted butter, in pieces
2T espresso or strong coffee
4 large eggs, room temp, separated
.66c sugar
3T rum, or other brandy/alcohol of your choosing
.5 t vanilla
pinch of salt
 
Ready multiple glasses or bowls for filling, or a 3qt bowl.
 
Over simmering water in a heatproof bowl, melt the chocolate, coffee and butter, then set aside. Don’t overheat.
 
In a second large bowl, combine the yolks, sugar and rum and place over the water. With a whisk beat the yolks while warming them until the consistency is thick, and they are lemony in color. Take care not to overheat and scramble the yolks. 
 
Remove from the heat until the yolks cool slightly. Then combine the chocolate and yolk mixture and stir to combine. Set aside. The yolks should be quite warm, but not hot.
 
In a very clean stand mixer, combine the egg whites and pinch of salt and beat on high until they get fluffy. Then sprinkle in 1T of sugar over egg whites and continue to beat until they are stiff but not grainy. They should have a slight gloss. When you remove the whip the peak will fold, but not melt back in.
 
With a spatula take a hefty spoonful of the whites and gently stir into the chocolate mixture to lighten. Then add the rest of the whites and gently fold in to the chocolate mixture. Take care not to beat down the airiness. 
 
Ladle or pour the mixture into your glasses or bowl. Cover and refrigerate for 3 hrs at least.
 
The mousse can be made up to 2 days ahead and kept in the fridge.
 
Remove from the fridge right before serving.


Share this:

  • Click to share on Pinterest (Opens in new window)
  • Click to share on Twitter (Opens in new window)
  • Click to email a link to a friend (Opens in new window)
  • Click to share on Facebook (Opens in new window)
  • Click to print (Opens in new window)
  • Click to share on Tumblr (Opens in new window)

Filed Under: chocolate, dessert, GF, gluten free Tagged With: chocolate, chocolate mousse, no cream chocolate mousse, no cream mousse

« Previous Page
Next Page »

Primary Sidebar

Thank you so much for your LIKES!

Thank you so much for your LIKES!
The Inner Circle
Join the Inner Circle For Exclusive Content
No Worries. This is just between us.

Top Posts & Pages

The {Famous} NY Times- No Knead Bread
Red Curry Chicken with Gingered Black Rice
Chocolate Mousse {No Cream}
Country Pate {Pate de Campagne}
A Moist Dense Olive Oil Polenta Cake with Candied Kumquats
Your Copy of No Knead Bread Booklet
my healthy aperture gallery
Certified Yummly Recipes on Yummly.com
Homemade Hot Sauce Link~ HuffingtonPost

Copyright © 2026 · Genesis Framework · WordPress · Log in