• Skip to content
  • Skip to primary sidebar

A Stack of Dishes

Something good is cooking...

  • Home
  • About
  • Recipe Index
    • Bakery
    • Dessert
    • Chocolate
    • Appetizers
    • Healthy Recipes
    • Main Course
    • Small Meals
    • Breakfast
    • Gluten Free
    • Side Dishes
    • Cocktails
    • Condiments
    • Gifts
  • Delicious Links

gifts

{Day 8} Fruit Compotes: Blue & Red Berry Mint and Orange Lavender

December 9, 2011 by Gail Watson

I love me some Jam, but I truly adore and delight in compotes. To me they are like the unruly stepchildren of the jam world. Born of the same genetics but never quite pulled themselves together.

What I really love about  compotes though is the syrupy texture, and in the case of the berries, a sassier taste from not cooking the fruit into total submission.

Compotes are quicker and easier to make and can be used in a so many fantastic ways. In every circumstance that you would use maple syrup a compote would be great. I use mine on waffles or pancakes, on my morning yogurt, or as is our family Christmas morning tradition, it’s warn berry compote over freshly made blintzes.

But not just for the morning. A jar of compote on hand can be ladled over Angel Food Cake to make a snazzy last minute dessert and, of course, ice cream or frozen yogurt is a natural.

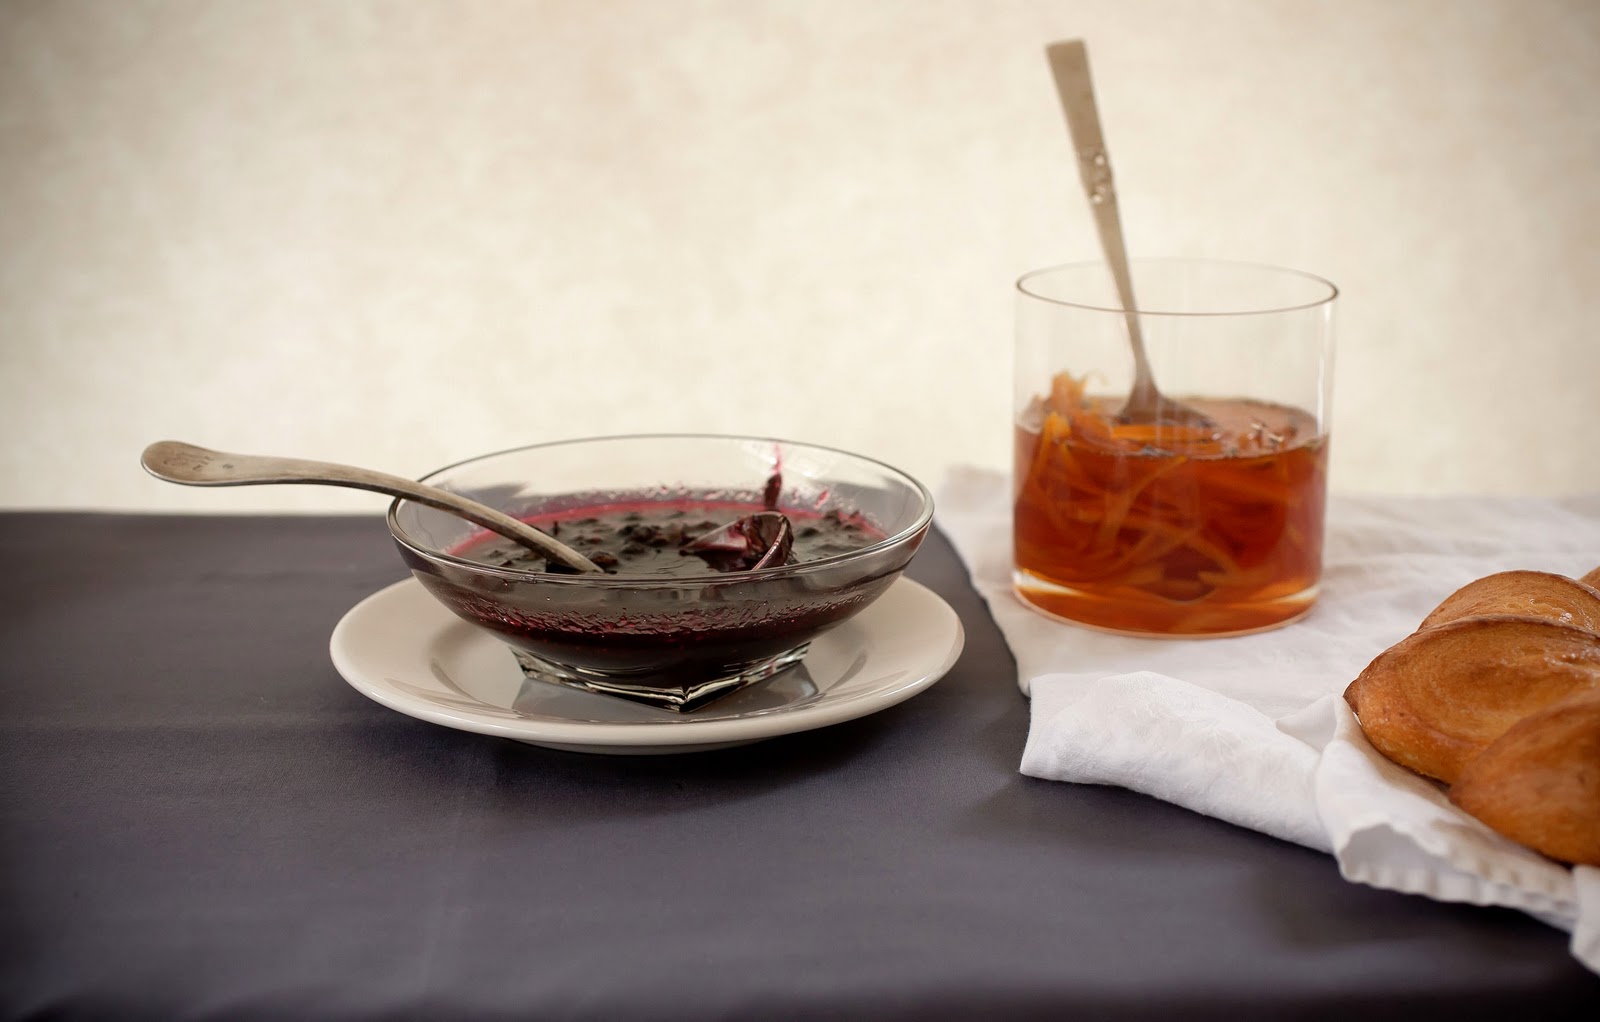
 Orange Compote with Lavender Flowers atop Greek Yogurt

I’ll tell you a secret too, which is that I pretty much always use frozen fruits. Either directly purchased from the market, or from my freezer bin. I keep a plastic lidded bin in my freezer at the ready. From time to time my fruit loving eyes are bigger than my stomach and fresh berries wait for no one, so as they start to demonstrate their diminishing rein, I’ll toss them into the bin. From there comes smoothies or as in this case, compotes.

The combinations are limitless, but these are my two favorites.

I’m not a fan of canning compotes and feel they are best put up and refrigerated. They should be sooner eaten than later, and you’ll want to.

Orange Lavender Compote
makes ~6 cups
 
6 large oranges, peel removed and sliced
Juice of the 6 oranges
1 lemon, peel removed and sliced
Juice of the lemon
8 cups water
9 cups sugar
small handful of lavender flowers
 
In a large heavy bottom sauce pan combine all the ingredients except the lavender.
 
Bring mixture to boil and simmer for 50 minutes. The volume will reduce by half and the peels will become tender.
 
Add lavender flower and simmer 5 more mins.
 
When cool transfer to clean jars and store in the fridge. Keeps for 5 weeks.
 
 
Blueberry and Red Raspberry Compote with Mint
makes  ~8 cups
 
5c blueberries
4c red raspberries
1c lemon juice
8c sugar
1 bunch fresh mint, finely chopped
 
In a large heavy bottom sauce pan combine all the ingredients except the mint
 
Bring all to a boil and then lower heat and simmer 20-30 mins. 
 
You can test the compotes readiness by chilling a plate in the freezer. Drop a small amount of syrup on the plate and tilt. Run your finger through the drip. If it holds and leaves a clean swipe, it’s ready. 
 
Compote should be on the syrupy side and not too jammy, but there does need to be a fair amount of viscosity.
 
Remove the compote from the heat and allow to cool 15 minutes, then stir in fresh mint.
 
As the compote continues to cool give it a stir to draw out and incorporate the mint flavor.
 
Transfer cooled compote into clean jars and store in fridge. Keeps for 3 weeks.


Share this:

  • Click to share on Pinterest (Opens in new window)
  • Click to share on Twitter (Opens in new window)
  • Click to email a link to a friend (Opens in new window)
  • Click to share on Facebook (Opens in new window)
  • Click to print (Opens in new window)
  • Click to share on Tumblr (Opens in new window)

Filed Under: condiments, GF, gifts Tagged With: candied fruit, compotes

{Day 7} Good Cheer: The Gift of Fine Drinking

December 8, 2011 by Gail Watson

Cocktails on the ready! If you’ve been following along you would have heard me refer to a few drinks a comin’ and now here they are. The beauty of these is that the two above are made from the residual syrups made from previous gifts. Ginger Lime Syrup from the Candied Ginger and Cowboy Cocktail is made from the syrup of the Cowboy Candy.
What I’ve done here is take those leftovers and added a thing or two and some booze and made the base of two delicious cocktails. Now all your loved one has to do is add some ice, some lime and a splash of soda or tonic, and they are good to go.
When I first made Cowboy Candy I was left with a pretty fair amount of syrup, perhaps about a quart. It was in the early Fall and it just called out tequila and lime to me. The syrup has not only a heat kick that is fierce, but the vinegary sweetness adds a tremendous balance to the tequila and lime. I’ve been reading a lot lately how bartenders are now finding balsamic vinegar into their cocktails and I now understand why. I invite you to try this just for the experience.
The Ginger Lime Syrup also has a pretty dynamic kick to it too. As a fan of Dark and Stormy’s this is a fantastic syrup to use for that. There is enough sweetness in it to avoid the ginger beer and just add rum and club soda. But I also like Gin and Ginger Tonic, which I did here.
Just be sure to label your concoctions and provide a recipe for the proper ratios.
I just think giving someone ready made cocktails for two can be a real treat for the right person. Especially when you’ve already done most of the work for them.
I also created a Chamomile Cordial, which I paired with biscotti. This came out of my love of Chamomile Grappa which I had the good fortune to have at the end of an outstanding meal at Babbo, Mario Batali’s Restaurant here in NYC. Chamomile is long known for is digestive properties but pairing it with grappa is unusual. The only company that makes it is in Italy and it’s not easy to come by here. The  chamomile grappa has a soft mellowness, a slight sweetness to it and the gorgeous aroma of the flowers. I’ve served this to querying guests after a dinner party and so far everyone has been an immediate fan.
Though since not everyone is a grappa fan, as it’s next of kin is rocket fuel. Grappa is made from the remaining “mash”, or skins and seeds, after grapes have been pressed for wine. It’s distilled and fermented and this clear alcohol can be intense in that “oh my goodness this is burning my throat” sort of way. So for those less into rough drink, I created mine with vodka, which turned down the volume a few decibels while still offering a swift kick.
Personally I love to sip it after a big meal or an especially long hard day. I suppose you could make a cocktail of it, but I’m not thinking that way. If you come up with something, please let me know- I’d be curious to see what creations could be made of this.
Gin and Ginger Tonic
 
If you’ve made the candied ginger and reserved the syrup than bravo! but if you haven’t, or need a fresh batch here’s how to start.
 
Take 2c of peeled and sliced fresh ginger and put into a heavy saucepan with 2c of water and 2c of white sugar. 
 
Bring to boil on the stove and then simmer for 30 mins. You can then remove the
 ginger and dry it and candy it {recipe here} or not.
 
While the syrup is still warm, add zest slices from 3 limes and allow to steep in the syrup until cool.
 
To make the cocktail base, combine 1 part syrup with 3 parts gin.
 
To make the finished cocktail the ratio is 1 part base to 1 part tonic (or to taste) and add lime. I recommend adding a tag with the recipe and explanation of your lovely elixer.
 
Cowboy Cocktail
 
Now if you’ve made the Cowboy Candy (and if not, seriously, you should) and you saved the juice, you’re good to go, or…..
 
slice .5# of jalepeno peppers
.33c white vinegar
1c white sugar
.25t ground cayenne
 
Combine in a heavy sauce pan and allow to simmer for about 10 mins. Reserve some peppers for garnish and discard the rest. Allow the syrup to cool. The full Cowboy Candy recipe is here.
 
Combine 1 part Cowboy Syrup to 2 parts tequila for the base
 
For the finished cocktail combine 1 part base with 1 part lime juice and a splash of soda water.
 
Don’t forget that tag with instructions- they’ll need it
 
Chamomile Cordial
this cordial is not overly sweet and really lovely after a big meal
 
8 chamomile tea bags or 1c loose flowers
4c water
4c sugar
vodka or a clear brandy for more kick or heck, go for grappa
 
In a large saucepan heat the water to boiling and let tea steep until cool. This makes a strong intense tea.
 
Remove tea bags or strain flowers and add sugar. Bring to boil and simmer 5 mins
 
Remove from heat and allow syrup to cool.
 
To make cordial combine 1 part chamomile syrup to 5 parts alcohol, or to taste. It should not by syrupy sweet, just a soft sweetness so you can feel the kick of the alcohol.

Share this:

  • Click to share on Pinterest (Opens in new window)
  • Click to share on Twitter (Opens in new window)
  • Click to email a link to a friend (Opens in new window)
  • Click to share on Facebook (Opens in new window)
  • Click to print (Opens in new window)
  • Click to share on Tumblr (Opens in new window)

Filed Under: cocktails, GF, gifts Tagged With: cocktail mixes, cocktails, cordials

{Day 6} Flavored Oils

December 7, 2011 by Gail Watson

When the day has been long and that chicken in the fridge just looks so, well, geez- another chicken? A splash of flavored oil can make the simple sublime. Mashed potatoes get beautiful chartreusey green puddles of yum with basil oil, take a weeknight pasta and drizzle it with smoked paprika oil and the next time you feel like popcorn- make it the old fashioned way on the stove and use a lemon or rosemary oil to pop the corn and then splash some more on top instead of butter. Sensational in a snap. Love it.
The best part is that flavored oils not only are a great go-to, but easy to make and easily makes smiles when you give them away. Three versions here today, lemon, basil and smoked paprika. I know, sounds way too simple right? why not Thai basil with vanilla and chilis? Because these are the staples, like I said, the go-to’s, the good pals that are there when you need them. From here all things are possible and limitless, but feel free to be creative, I won’t mind. Take these oils as a base and feel free to add to them.
There are two methods to adding flavor to oil, both simple. The hot method: warm oil, add flavoring in the form of herbs or spices and allow to steep, then filter and bottle.  The cold diffusion method requires just adding the flavor to the oil and give it plenty of time to steep. I made the lemon oil this way which infused a brightness from the lemon that is just out of this world.
If you decide to leave leaves, or zests or especially garlic in your bottles- be sure that they be stored in the fridge. Weird things can start growing and that is just not a good thing.
I bottle mine in smaller bottles when giving them away. They can be tucked into bags with other treats, given as pairs or sets, and it doesn’t impose the receiver to give up too much fridge or counter space. Besides, little jewels are also so much more delightful, and who doesn’t like jewels?
Hot Oil Infusion Method
No quantities here, this is by your taste- but a good start is one bunch of fresh herbs to every quart of oil or 3T of spices. Use a mild olive oil over a plain vegetable oil.
Warm oil to 185˚ in a heavy duty saucepan.
Add bruised fresh herbs or combine all in a blender for more intense and faster results.
or add spices that have first been dry toasted in a pan stovetop. Toasting releases the oils and aromatics to get the party started.
Once cooled  and rested overnight, taste the oil for flavor balance. Add more oil to the batch if it’s strong or rewarm and add more flavoring. The flavors do take a few days to develop so don’t expect too much at first, by day 3 or 4 you are truly there.
Cold Oil Infusion Method
Take bottle, add herbs or spices, pour over oil. Done. Good. Mostly.
I made the lemon oil by whizzing a cup of oil with the zest of one lemon in a blender then added it into a quart of oil. All that beating and battering released more oils into the base and can I tell you? divine. It left the oil cloudy at first but a few days later- sparkling lemon flavor and a clear oil.
Bruise any fresh herbs first, let them steep in the oil in a bucket or large jar for at least 2 weeks and then strain. If you like the look you can put fresh pretty herbs and spices into the gift bottles for a nicer presentation.

Share this:

  • Click to share on Pinterest (Opens in new window)
  • Click to share on Twitter (Opens in new window)
  • Click to email a link to a friend (Opens in new window)
  • Click to share on Facebook (Opens in new window)
  • Click to print (Opens in new window)
  • Click to share on Tumblr (Opens in new window)

Filed Under: GF, gifts, gluten free Tagged With: basil, flavored oils, gifts, gluten free, holiday gifts, lemon, paprika

« Previous Page
Next Page »

Primary Sidebar

Thank you so much for your LIKES!

Thank you so much for your LIKES!
The Inner Circle
Join the Inner Circle For Exclusive Content
No Worries. This is just between us.

Top Posts & Pages

The {Famous} NY Times- No Knead Bread
Country Pate {Pate de Campagne}
Power Packed Oat Scones: One healthy, the other healthier
Lentil and Kale Salad with Carmelized Parsnips
Spaetzle: Delicate Dumplings
Red Curry Chicken with Gingered Black Rice
my healthy aperture gallery
Certified Yummly Recipes on Yummly.com
Homemade Hot Sauce Link~ HuffingtonPost

Copyright © 2025 · Genesis Framework · WordPress · Log in