• Skip to content
  • Skip to primary sidebar

A Stack of Dishes

Something good is cooking...

  • Home
  • About
  • Recipe Index
    • Bakery
    • Dessert
    • Chocolate
    • Appetizers
    • Healthy Recipes
    • Main Course
    • Small Meals
    • Breakfast
    • Gluten Free
    • Side Dishes
    • Cocktails
    • Condiments
    • Gifts
  • Delicious Links

candy

8 Tips For Making Successful Caramels

December 18, 2012 by Gail Watson

Man do I love me some caramels. They are an awesome holiday food gift and easy to make, and they are also easy to not do well.

People often say to me that they can cook but not bake. Their reasoning is that baking is specific and scientific, whereas cooking is more forgiving. To certain degrees this statement is true, but when it comes to candy making it is hard fact.

Variations in degrees, humidity, ratios or handling can make or break a candy. Some you can get away with, but honestly, not really.

Here are a few best practices and tips for making candies in general and specifically caramels.

1. Thermometer– Pre-test your thermometer for accuracy. A degree or two off can make the difference to how your sugar hardens. To test take a pot of boiling water and completely submerge the thermometer into the water without touching the bottom of the pot. Boiling water is 212˚- no higher or lower. Make a note of where your thermometer lands. If it’s a degree or two off, make a note and adjust your recipe accordingly.

2. Cleanliness– Some recipes call for an absolute grease free environment. Before making candy I rewash all utensils- bowl, pot, spatula, thermometer, measuring instruments, etc.- in hot soapy water and dry with paper towels or air dry. I do NOT use a used kitchen rag.

3. Pure Ingredients– make sure that the sugars you are using are contaminant free. If you used a wet spoon and dipped into the sugar bin, or used a measuring cup that was previously used for flour, this can contaminate the sugar. You can get away with this with baking, but not with candy making.

4. Prepare– Making candy is about timing and readiness. Have all ingredients and utensils prepared and laid out before you begin. Sugar temperatures can change quickly sometimes and you don’t want to be caught unawares.

5. Patience– Don’t rush the sugar boiling stage. A better caramelization happens with a slow development over time. It will also serve you by inadvertently overshooting the temperature when your head was turned for just a moment.

6. Eyes on the Prize– Boiling sugar is it’s own animal. It can turn quickly, and it can also hurt you. Boiling sugar is about the most dangerous thing in the kitchen- boiling oil being second.  If you get splashed with molten sugar it sticks to the skin and can cause nasty burns. So especially with inexperienced kitchen helpers, you MUST stay vigilant.

7. Don’t Stir– This is a very common mistake for first time candy making. Stirring boiling sugar causes the crystals to become unstable and start to bind. The result is grainy, cloudy or lumpy candy. When it comes to making pralines this happens to be the effect you want, but with caramels, absolutely not.  You can stir in the very beginning to incorporate the ingredients, but once it gets boiling, hands off! It will be tempting, even if sugar crawls up the sides, just let it go. Promise me-  you’ll be glad you did.

8. Don’t Touch– It’s also very common to want to poke your fingers into the just finished candy. After all it looks SO beautiful- but it will hurt you. Admire your work- from afar, and give it twice as much time as you think to cool. Sugar is dense and holds its temperature very well, so please err on the side of caution.

I’ve used several different recipes over the years. Martha Stewart printed a recipe in the latest Living issue {December 2012, pg 99} that was a bit different. Typically the heavy cream is added into the hot syrup once it has reached temperature. This recipe added the cream at the start. I was skeptical but I tried it and it was great. Pouring cream into hot sugar is a bubbling, steaming, terrifying and dangerous thing, not to mention often messy with cream boiling over onto the stove (the WORST to clean up). Adding the cream at the start avoided all that. This will now be my method of choice.

Martha Stewart’s Salted Caramels
modified from the December 2012 Martha Stewart Living Magazine
makes approx 120 pieces
 
vegetable oil, for greasing baking sheet
2c heavy cream
2.25c sugar
6T unsalted butter, cut into pieces
1.25c light corn syrup
.5t coarse salt- I used Maldon flaked salt
.5t pure vanilla extract
 
wax paper or cellophane wrappers


Lightly brush bottom ans sides of a 9×13″ rimmed baking sheet with oil. Line with parchment, leaving an overhang, and oil that as well.
 
In a heavy 5qt saucepan, combine the cream, sugar, butter and corn syrup. Bring to a boil over medium heat, and continue to boil without stirring, until the thermometer reads 248˚. It took me about 25 mins.
 
The cream will be bubbly and high at first. It will calm down as it reaches temperature and turn a beautiful caramel color.
 
Remove the pan from the heat and stir in the salt and vanilla. Immediately pour into the prepared pan and do not scrape the bottom. Just let whatever pours out fall into the pan.
 
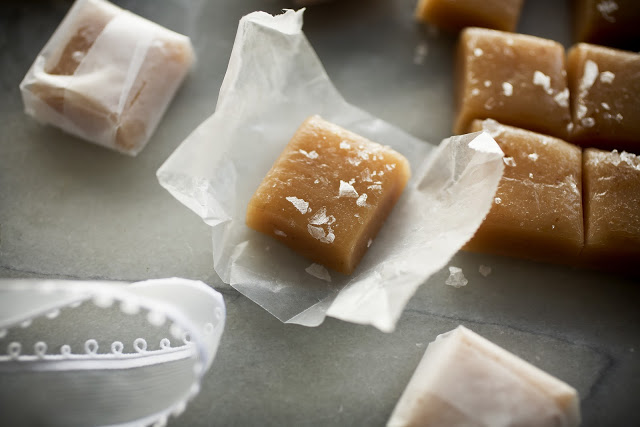
After 3 minutes, sprinkle the top with more salt to your taste.
 
Allow the caramel to rest, uncovered, overnight or at least 8 hrs.
 
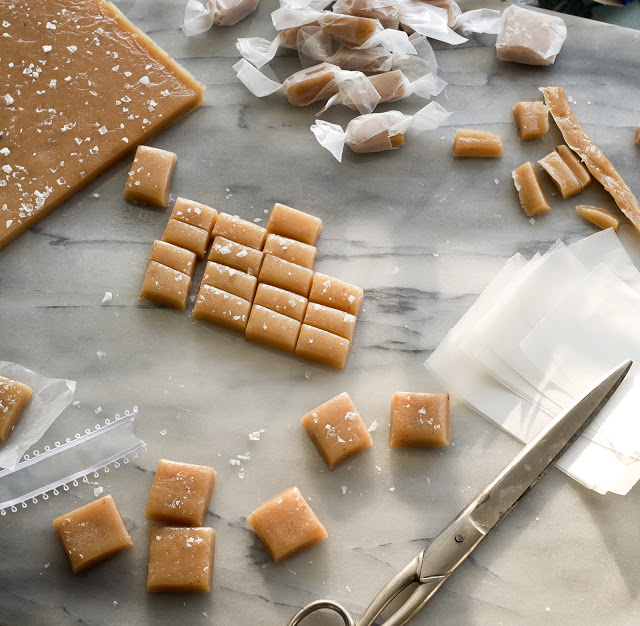
Remove the caramel from the pan and peel away the paper. With a sharp knife cut the caramels to the shape you want. .75″x 1.25″ is the size she made.
 
Immediately wrap in cellophane or wax paper. 

Enjoy, be safe and have fun. Your friends will love you for making these.

Share this:

  • Click to share on Pinterest (Opens in new window)
  • Click to share on Twitter (Opens in new window)
  • Click to email a link to a friend (Opens in new window)
  • Click to share on Facebook (Opens in new window)
  • Click to print (Opens in new window)
  • Click to share on Tumblr (Opens in new window)

Filed Under: GF, gifts, gluten free Tagged With: candy, caramels, gifts, gluten free, sweets

{Day 4} A Tradition Renewed- Marzipan Fruits

December 5, 2011 by Gail Watson

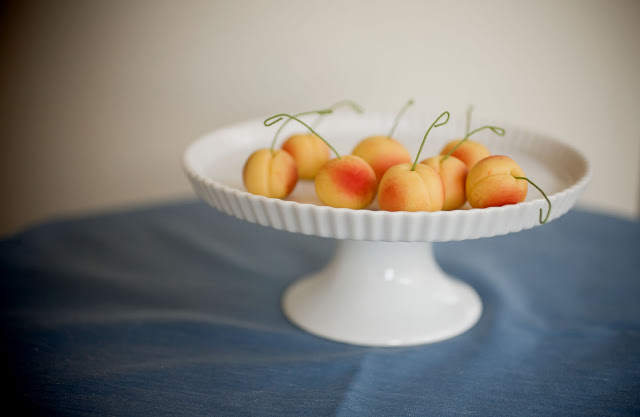
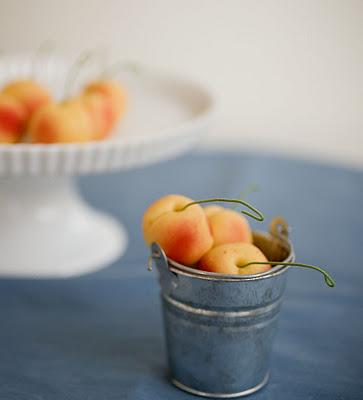
Marzipan Cherries

The tradition of modeling marzipan (almond paste candy) for the holidays is an old one and if found in many different cultures. The Italians make it and so do many Northern European countries-Germany, Sweden etc.  Hand made marzipan is an art that has sadly waned. Most that you see these days is machine made and with a low quality of almond paste. The colors are sprayed on and for the most part they are just ghastly.Hand making marzipan is not difficult to do and a fantastic thing to make with kids as it doesn’t require a stove or oven- and mistakes can just be nibbled out of sight.

Years ago I had a marzipan business with a woman named Kim Jurado that we called Bella Dulce. We made gorgeous marzipan that we put into small rustic wire baskets from artisans in Mexico, or tiny wooden crates to look like imported fruits. One of my favorites was to build the marzipan into topiaries that brides would use as centerpieces. Stephen Spielberg had us make tall gorgeous topiary cones for his movie Armistad and our beauties also made it into Dean and Deluca and Williams Sonoma catalogs. In those days we had a legion of workers hand making marzipan. All day long hands were rolling, shaping and dusting lumps of almond paste into rows and rows of beautiful bright almond candies. It was an artisanal business before it was vogue.
Marzipan is made from blanched almonds and sugar into a dough. It’s possible to make it from scratch, but to be honest, I don’t find it time or cost effective. I’ve tested a lot of marzipan over the years, and by far the best is made by American Almond (see Holiday Resource page). A lot of marzipan out there has a high sugar content, leaving it super sweet and lean on good almondy flavor. American Almond has the highest almond to sugar ratio which makes it heavenly. Marzipan does not come cheap but most fruits are about a half to one ounce each, so a pound goes a long way.
There are simple tools needed to shape the dough, but mostly you can get by with what you have around the house. Toothpicks, a knife and a dowel stick work well- or you can purchase modeling tools that are typically used for clay. What you will need to get is powdered food coloring and gel food coloring, paint brushes, cloth covered wire and paper leaves- all of these things can be purchased at NY Cake and Baking Supply.
Marzipan is such a great medium that you can do many other things with it. The fruits are classic, but little Santa hats are awesome, or Xmas light bulbs. It’s great for making leaves and mushrooms for Buche de Noel or reindeer antlers for cupcakes.
Unused marzipan can be saved for future use if stored properly. Wrapped tightly and put into an airtight container it will keep it for several weeks. For longer keeping it can go in the fridge.
How to Make Marzipan Cherry, Pear and Plums
yields 20-30 fruits depending on size
 
1# American Almond Marzipan
juniper green food paste
golden yellow food paste
royal blue food paste
red powdered food coloring
purple or burgundy powdered food coloring
soft paint brush-like a blush brush
cone tool (or rounded toothpick)
veining tool (or butter knife)
green florist wire 24 gage
small paper rose leaves
 
Queen Anne Cherry
 
Paste food coloring is very intense, so start out with tiny dots and add on from there. You can always add more. Use a toothpick dipped into the color pot and dot the marzipan then knead through.
 
The cherries should have a soft golden yellow color.
 
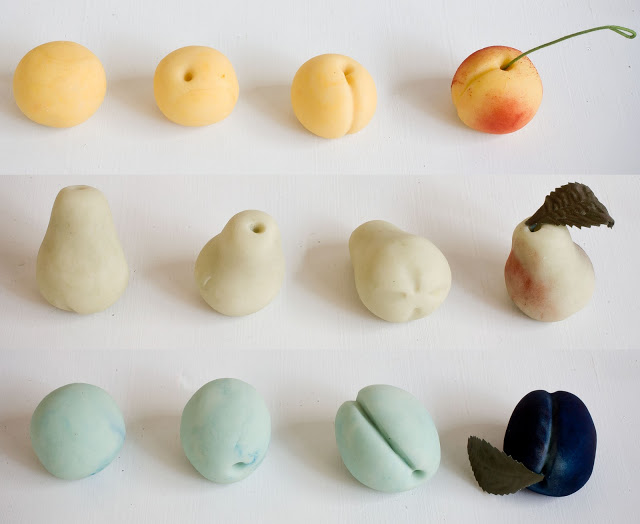
Next follow the grid above. Pinch off a small chunk and roll between your palms to make a ball, then using the cone tool make an indentation on the top- or use a toothpick to ream in a dent. Then with the veining tool or the back side of the butter knife, draw down from the hole and make the crease of a cherry cheek.
 
To color tap out a small amount of red powder color onto a plate. Using just a small amount dab the brush into the color, just as you would if you were applying powdered blusher. With a circular motion paint on the “cheeks” of the cherries.
 
Finish off with a 3″ length of wire. Fold down one end to make a knob and then curve the stem into a natural shape. Tuck into the hole in the top.
 
Pear
 
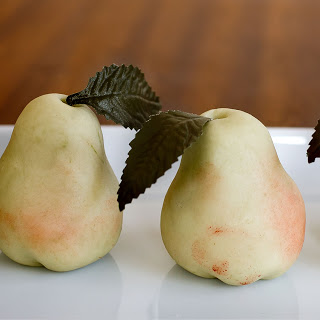
I used the juniper green for the paste color. Follow the directions above to tint the marzipan.
 
To make the pear shape first roll a knob of dough into a ball. Then, using your fingers coax one end into the neck of the pear. Then give a little tap on the bottom to square it off just a little bit.
 
Pierce the top of the pear to make the stem dent. Then on the bottom of the pear create four dents which create that round bottom look a pear has.
 
Dust just a liiiiiiitle bit of red onto the sides of the pears and finish off the top with a paper leaf.
 
Plums
 
Plums have an ashy blue grey line in the crease which I personally love. Color the marzipan a soft blue using the royal blue paste.
 
Then roll the marzipan into a ball and then into an oblong ball.
 
As with the cherry make a dent at the top and crease down the length of the plum. Plums have deeper creases though. I make a fairly keep crease and then soften the cut edge with my fingers. I then pinch the seam closed a little to give that cheeky look.
 
Dust the plums with the color and for these it takes a lot, avoiding getting color into the crease. Finish off with a paper leaf.
 
********************
 
Once made the marzipan can be left out to dry a little. Left out indefinitely they will turn to stone. If you intend for them to be eaten, or given as gifts, keep them under plastic or present in a clear plastic box or cello bag. Both of these can be purchased at Glerup.
 
 
*see resource page for links to Glerup, NY Cake and American Almond*

Share this:

  • Click to share on Pinterest (Opens in new window)
  • Click to share on Twitter (Opens in new window)
  • Click to email a link to a friend (Opens in new window)
  • Click to share on Facebook (Opens in new window)
  • Click to print (Opens in new window)
  • Click to share on Tumblr (Opens in new window)

Filed Under: dessert, GF, gifts Tagged With: candy, gift food, gluten free, marzipan

{Day 1} White Chocolate Candies

December 2, 2011 by Gail Watson

Candy making is a true science. They say that about baking but truthfully there is sooome leeway in baking- candy making? not so much- but SO satisfying and your friends will be mega impressed.

Making chocolate candies like a pro requires tempering of the chocolate. This is a process of melting and cooling the chocolate that develops the cocoa crystals. The result is a glossy snappy chocolate that doesn’t streak or bloom. This can be a little on the fiddly side, but I promise, it absolutely is doable.

My best advice is to give yourself plenty of time and an uber clean work environment and then relax and enjoy. Water is an enemy of chocolate tempering, so if your melting your chocolate over a double boiler take extra care not to let any drips get into the bowl.

The method highlighted above is simple and direct. You can use an instant read thermometer like the one you stick in the Turkey bird. There is a specific glass chocolate thermometer with a narrow temperature range. Not an expensive investment, but not really necessary. Another word of advice- the greater the volume of chocolate the more stable it will be and temperature variables will be slower. The worst case? If you overheat the chocolate it will lose it’s temper, and like a sleep deprived 2 year old, there is no bringing it back to behave. Not a loss though, the chocolate is still delicious and can be used in baking, truffle fillings or icings.

When it comes to making chocolates, I use a chocolate tempering machine. I purchased my Revolation 2 about 15 years ago. I don’t do a ton of candy making or dipping, but man oh man, do I love this machine. If you can get your hands on one, or share one with a pal- it’s awesome. Remember, there are Valentines and Easter opportunities…

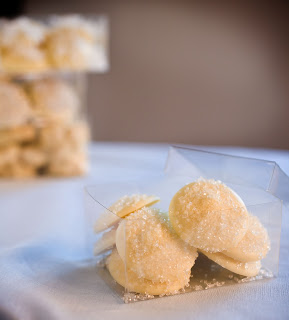
Tips on making Nonpareils:

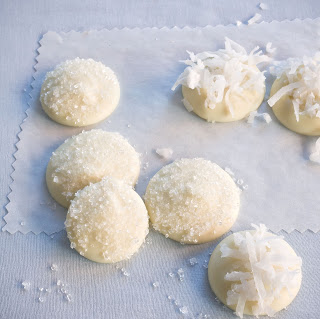
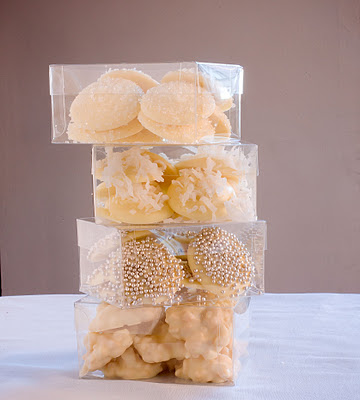
These candies can be made with any color of chocolate but I just love the white on white for the holidays.

Make sure you get the smallest silver dragees possible. I used size 0- any larger and they are too crunchy to eat gracefully.

When decorating with the dragees let the chocolate set for a minute or two before sprinkling on the dragees. Because they are a little heavy they will sink into the chocolate when it is first poured. My method is to pipe out an entire tray and then decorate. Have all your goodies at the ready, cooling chocolate waits for no one.

When piping out chocolate use a CLEAN pastry bag or make a parchment cone. Any contamination in the chocolate makes it cranky.

Properly tempered chocolate that is left over can be melted and tempered again. Ain’t that a beautiful thing?

A word about chocolates- firstly, NO NOT use “coatings”. These are waxy substitutes for chocolate the way Velveeta pretends it’s cheese. Using quality chocolate is really worth the price and effort here. It’s best to buy chocolate in block form from a dealer and not buy bars at the supermarket. NY Cake and Baking supply sells in smaller and larger quantities and so do many other sources. If you plan on making chocolates for Valentines, investing in a slab, or 5 Kilo (11lb) block can be worth it as the cost is about half and it will keep. Just store in a cool place or wrap tightly and store in fridge- just keep the wrapping on when warming to room temperature. You don’t want to create any condensation on the chocolate (see above about water and chocolate).

Lastly- when adding things in to make clusters keep in mind the temperature of them. Whatever you use needs to be room temp otherwise it will throw off the temper. This goes for dipping cold centers since the chocolate that drips back into the bowl will be cooler. Watch the temperature level of the chocolate and keep it in range- my machine alerts me with a beep when the temp starts to slip out of range- so I just wait a minute until it brings the temp back on track (SEE why I love this thing so much?).

See the resource page at the top of the page for purchasing sources for all needs here.

White Chocolate Nonpareils
 
2# of chocolate- produced about 8 of these boxes
silver dragees, size 0
sanding sugar
sweetened coconut
Round piping tip size 10
Clean pastry bag- disposable plastic bags are the best
 
Prepare a flat area with parchment paper. If you’re planning on making a big batch lining a counter is fine. The chocolates set in a few minutes and unless you have a ton of baking sheets this is just fine. A granite counter is even better.
 
Prepare pastry bag and fit with the tip and line up your toppings
 
When all is at the ready then start tempering your chocolate. No walking away from melting chocolate and I do not recommend using the microwave for making candies. I know people do it, but it’s too loosey goosey when it comes to temperature control, and hot spots in the chocolate will make it lose temper.
 
When the chocolate is tempered time to fill the pastry bag.
 
Turn down the sides of the pastry bag and fold back the tip to prevent the chocolate from leaking out. You can set this up in a jar or glass for better control. Once filled twist the top of the pastry bag to prevent the chocolate from oozing out of the top.
 
You are ready start your piping. Do this as swiftly as possible but with grace. Hold your finger over the end of the tip to prevent the chocolate from leaking out between piping.
Squeeze the bag while holding the twisted part closed between thumb and finger. 
 
Try to make even sized rounds. I first measured my boxes to make sure my circles would fit nicely. However, no rules here- make ovals, squiggles, long bars, letters of the alphabet…
 
After a minute to allow the chocolate to juuust set- you can see the sides of the chocolates start to dull a little.
 
With a spoon sprinkle on the toppings. The dragees are best done on a baking sheet to capture stray beads which can be reused.
 
The coconut I “tucked” into the chocolate to make sure that there was a nice knot to bite into. To do this simply press the coconut gently down into the mound.
 
Allow the chocolates to cool and harden. Allowing them to slowly cool will create a greater sheen and a finer look. Putting them into the fridge is fine, but not my preference.
 
If your kitchen is very warm this can affect the process, so the cooler the room the better. Make chocolate on non baking days.
 
**if you’re finding your chocolates are just not setting up you can switch to “cold chocolates”  that you will just have to keep in the fridge. Not a bad thing- so remember that’s always a back up**
 
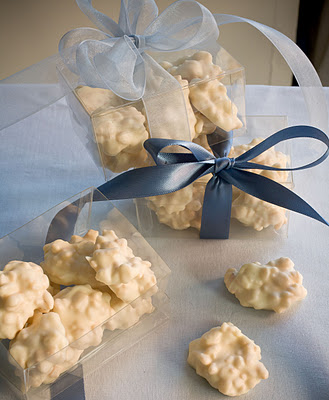
White Chocolate Rice Krispy Clusters
 
When I near the end of my candy making I like to use the remaining chocolate to make clusters. You can use a variety of things such as nuts, dried fruits or in this case, Rice Krispies- just remember, nothing wet like sliced berries…
 
There are no measurements here, just eyeball the additions. Factor a 1:1 ratio- there is really no right or wrong.
 
With a spoon drop mounds onto prepared parchment and allow to set as above. 
 
Personally I like tiny clusters- it’s a nice treat to take petite nibbles rather than indulge in a big puck of chocolate.
 
 
***************************************
 
Once the chocolates and set you can package them right up.
 
Store in a cool dry place.
 
Please see the Resource Page in the header bar for links to boxes and ribbon sources.


Share this:

  • Click to share on Pinterest (Opens in new window)
  • Click to share on Twitter (Opens in new window)
  • Click to email a link to a friend (Opens in new window)
  • Click to share on Facebook (Opens in new window)
  • Click to print (Opens in new window)
  • Click to share on Tumblr (Opens in new window)

Filed Under: chocolate, dessert, gifts, gluten free Tagged With: candies, candy, chocolate, Dessrt, gift candy, nonpareils, snowcaps, white chocolate

Primary Sidebar

Thank you so much for your LIKES!

Thank you so much for your LIKES!
The Inner Circle
Join the Inner Circle For Exclusive Content
No Worries. This is just between us.

Top Posts & Pages

The {Famous} NY Times- No Knead Bread
Sourdough Series: Part 1- Starter
Sorghum Salad
Short Rib Tacos with Cilantro Lime Cream
Dark Chocolate Popcorn with Sea Salt and Peanuts
Side Dishes
my healthy aperture gallery
Certified Yummly Recipes on Yummly.com
Homemade Hot Sauce Link~ HuffingtonPost

Copyright © 2025 · Genesis Framework · WordPress · Log in