• Skip to content
  • Skip to primary sidebar

A Stack of Dishes

Something good is cooking...

  • Home
  • About
  • Recipe Index
    • Bakery
    • Dessert
    • Chocolate
    • Appetizers
    • Healthy Recipes
    • Main Course
    • Small Meals
    • Breakfast
    • Gluten Free
    • Side Dishes
    • Cocktails
    • Condiments
    • Gifts
  • Delicious Links

chicken

Pan Roasted Lemon Rosemary Chicken with Smoked Cheddar Grits

November 8, 2011 by Gail Watson

As the Fall days progress into increasing darkness and cool air I have a natural tendency to lean toward warmer flavors and comfort foods. The color and texture of foods change, the farmer’s market is filled with deeper richer color and tastes. Whenever I get a whiff of the piney perfume of rosemary it moves me to think of cozy sweaters and turning on stoves. Into the kitchen, to make a comforting culinary cocoon.
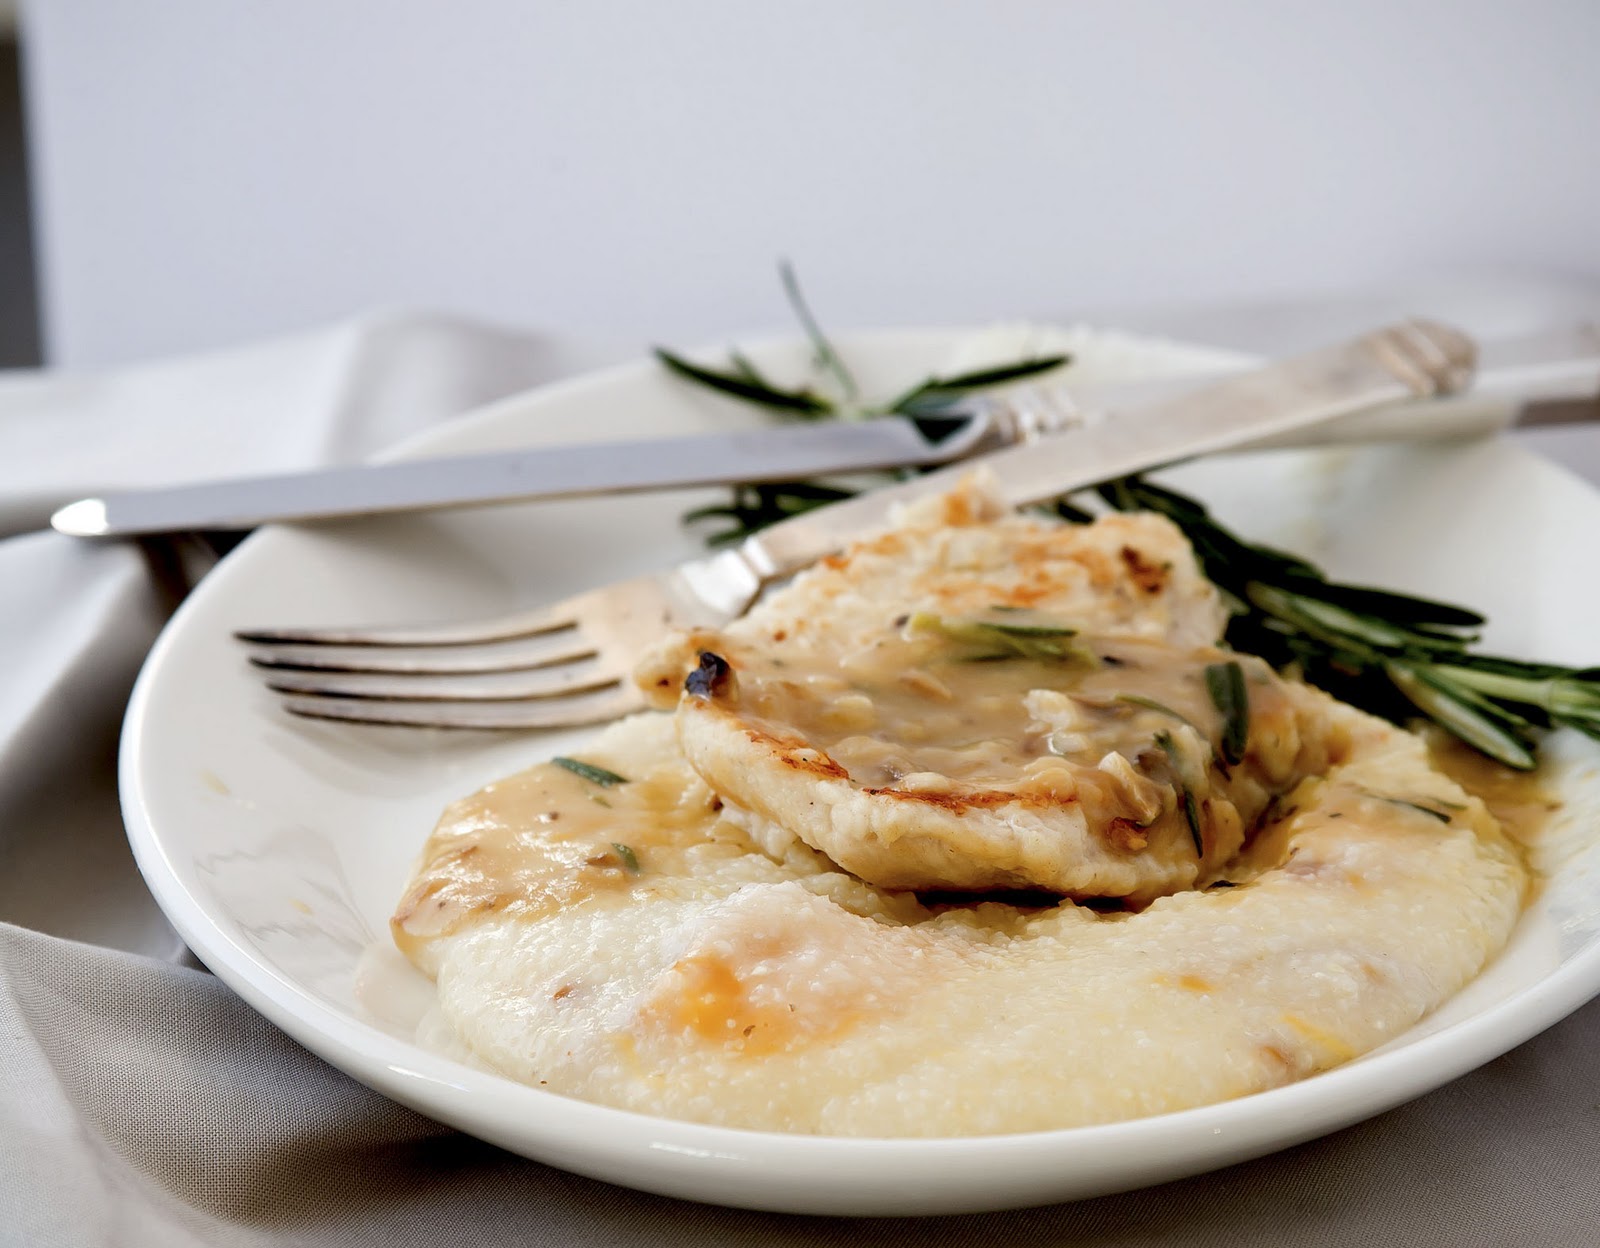
Pan chicken is a classic. The floured breast gives up enough juice to create a baseline to make a lemony rosemary sauce. Silky from the thickening flour left on the bottom of the pan, rounded out by a lump of butter- the rosemary is the mid tone with it’s harmonious partner, garlic, and at the top, the bright zing of lemon.
All it needed is a creamy pairing of grits that is laced with some healthy chunks of smoked cheddar. Polenta here would be fine, but to my taste just a tad too corny. The grits are more neutral and I make them to the creamier side. The gooey mush with the earthy tones of the cheddar lend a beautiful base line to this harmony.
 
Smoked Cheddar Grits
 
makes 4 servings
 
3.75 c chicken broth
1c instant grits
healthy pinch of salt
6oz of smoked cheddar cut into small chunks
 
In a medium large heavy saucepan warm the grits to boiling. 
 
While agitating the water add the grits and stir to smoothness and reduce the heat. Cover the pan and allow the grits to swell and thicken for about 8 mins. Stirring occasionally.
 
The grits should not be as thick as oatmeal coming out the pot. They will set as they cool, so if necessary add some additional chicken broth to create a thinner mush.
 
Keep the grits warm while you prepare the chicken.
 
Just before serving toss in the cheese and give it a gentle stir. Let it sit for a minute to melt the cheese. I like to find pockets of melty cheese in my grits so I don’t mix them again after this.
 
Lemon Rosemary Chicken
serves 4
 
4 large chicken breasts-trimmed and pounded to an even thickness
a few T of AP flour seasoned with Salt and Pepper
2T butter
1 clove crushed minced garlic
.5 c white wine
.5 c chicken stock
2T fresh rosemary rough chopped
Juice and grated rind of one good lemon
 
Place the flour mixture on a plate and dredge the chicken on both sides, giving it a healthy coating
 
In a large frying pan melt the butter and add the garlic. Sautee gently for a few minutes to release the flavor of the garlic into the butter taking care not to toast it.
 
Add the chicken and cooking on the first side ~5 minutes- turning once and cooking for another ~3 until done. Please adjust cooking times to your heat level and thickness of breast.
 
Remove the chicken and place on a side plate then cover to keep warm while preparing the sauce.
 
In the pan, over medium high heat, pour in the wine and deglaze the pan. The flour that is left behind will create a thick lumpy sauce. Slowly add the chicken stock while continually stirring the sauce smooth. 
 
Add the rosemary and allow the sauce to gently simmer for a few minutes to cook out the flour and meld the flavors.
 
Right before serving stir in the lemon rind and juice. You can add the chicken back into the pan to coat the chicken with the sauce and make it warmer, or simply spoon the sauce over the breasts. 
 
Be sure to taste the sauce when it is done to balance out the flavors. Feel free to add a bit more butter or seasoning if you feel it needs it.


******
 
To my understanding leftover grits are not to be done, but I wouldn’t let any of it go to waste. The next morning I reheated the grits in a pan with a little milk to bring back the creaminess. To go along with it poached eggs with runny centers were perfection.


Share this:

  • Click to share on Pinterest (Opens in new window)
  • Click to share on Twitter (Opens in new window)
  • Click to email a link to a friend (Opens in new window)
  • Click to share on Facebook (Opens in new window)
  • Click to print (Opens in new window)
  • Click to share on Tumblr (Opens in new window)

Filed Under: main, main course Tagged With: cheddar, cheese, chicken, eggs, grits, rosemary, smoked cheddar

Thai Spring Rolls with Fire-y Chicken

September 16, 2011 by Gail Watson

spring roll, thai spring roll
Crunchy Spicy Minty Tangy Deliciousness
Spring rolls used to be too daunting for me to consider making. Those papery skins looked too fragile and tricky to work with. At the beginning of my cake career (ca. 1987) I shared a kitchen with a caterer who made the spring rolls regularly. One of the beauties of sharing that space was being able to peek over shoulders and learn about things I knew little about.
Their method for dampening the rice paper was to use a spray bottle with fresh water. There is a lot of control in the amount of moisture with this method, and they could really hustle through the piles of rolls that they needed to make. I’ve never been able to keep such a dedicated bottle in my house, and so afraid that some cleaner might have snuck in by one of my kitchen staff, so I revert to the “dip method”, which is to slide the sheet into a bowl of cool water and out immediately.
The sheet will still be stiff at first, but by the time I load it up, it’s soft enough to roll. I can work 2 at a time if I’m feeling swift, but I recommend not rushing it as torn rolls are frustrating and a sad sad thing….


For this recipe I make my own ground chicken. It’s super easy to do, and into the mix I put in chilies, garlic and onion. It takes two seconds in the cuisinart and I love the slight green tint the chilies give to the meat. Since I typically purchase chicken breasts in bulk and have them portioned out in the freezer, I can defrost and whip these up whenever the mood strikes. Actually, truth be told, it’s more like when I have mint and cilantro in the fridge that I get the inspiration to make these jewels.
You can serve these with any kind of Asian sauce, but I prefer my Soi 5 Chili Sauce. When my fiancee and I were in Chiang Mai last, my favorite place to eat was an outdoor Gai Yang place. You could spot the place a block away from the billowing fragrant smoke of the grilling chicken, which they did right on the sidewalk. You have to walk past the grill master to get into the rustic restaurant that is filled with locals all day long. With side the chicken is served this rocket hot and amazing chili sauce (and Som Tom and sticky rice, ohhhhh). Since they make it there themselves I tried to get the recipe, but I was Thai-politely told that regrettably they could not share it. After returning home I put to task recreating the sweet tangy and super spicy sauce. I will have to return to Soi 5 (Fifth Street) to compare, but I think my version is damn close.
Thai Spring Rolls with Fire-y Chicken
 
1# Chicken breast- feel free to substitute pork, shrimp or chicken thighs here, cut into small chunks
1 small white onion minced
3 cloves garlic, rough chopped
Thai chilies to taste is preferred, or jalepenos which I used here (1), rough chopped
rice paper wrappers
cucumber sliced thinly into long strips
red onion, french sliced thinly
fresh mint leaves
fresh cilantro leaves
fresh lime
Soi 5 Chili Sauce (recipe coming soon)
 
In a food processor place the onion, garlic and chilies and give a whir to mince more finely. 
 
Add chicken and pulse until uniformly incorporated and chicken is thoroughly minced.
 
Heat frying pan to medium high. With a small amount of oil in the pan cook the chicken mixture until just cooked through, just a few minutes. You may add some S&P if you like here. Remove from heat and allow to cool.
 
In a bowl of cool water dip the rice paper wrapper and lay on cutting board. Working quickly, on the bottom half of the round first lay the mint leaves nicely, as they will show through the paper.
 
Then lay down a row of cucumber, cilantro, red onion and a few tablespoons of the chicken mixture, then spritz with a hit of lime.
 
With the finesse of a Thai master, roll up the same as you would an egg roll. Try to roll as tightly as you can without tearing the paper. The paper may be sticky. Dipping fingers into water will make it easier to handle. Carefully place the rolls onto a tray lined with parchment or wax paper. As they sit they will dry and become less tacky to the touch.
 
Serve and eat as soon as possible. They are the best fresh. Or cover in the fridge for up to a half a day. If the paper dries out you can refresh with a little cool water.
 
I have made these with several friends and family over the years. The first roll or two is typically pretty frightful looking- though just as delicious. It only takes a little practice to get tight pretty rolls. I say eat the first once right off while standing over the board. It will give you the sustenance and incentive to become Master roller.


Share this:

  • Click to share on Pinterest (Opens in new window)
  • Click to share on Twitter (Opens in new window)
  • Click to email a link to a friend (Opens in new window)
  • Click to share on Facebook (Opens in new window)
  • Click to print (Opens in new window)
  • Click to share on Tumblr (Opens in new window)

Filed Under: appetizer, gluten free, Healthy Recipes, main, main course, Small Tagged With: appetizer, chicken, healthy main course, healthy recipes, healthy small meal, spicy, thai

« Previous Page

Primary Sidebar

Thank you so much for your LIKES!

Thank you so much for your LIKES!
The Inner Circle
Join the Inner Circle For Exclusive Content
No Worries. This is just between us.

Top Posts & Pages

The {Famous} NY Times- No Knead Bread
Sourdough Series: Part 1- Starter
Sorghum Salad
Short Rib Tacos with Cilantro Lime Cream
Dark Chocolate Popcorn with Sea Salt and Peanuts
Side Dishes
my healthy aperture gallery
Certified Yummly Recipes on Yummly.com
Homemade Hot Sauce Link~ HuffingtonPost

Copyright © 2025 · Genesis Framework · WordPress · Log in